Building my own arcade machine
When I was a kid I used to love playing arcade machines. There were none in the town I grew up in, but in the bigger city it would be a treat to play on them. Now, many years later, I still jump at the chance to play on them. Sadly they are becoming more and more difficult to find.

Recently I took my kid to the arcade hall in Almere. There is a The Gamebox over here which has many types of fun games, including 1 old skool arcade cabinet. We had a blast playing on it together.
A few years back I watched a video by I Like To Make Stuff about building your own cabinet and I had done quite some research on the various components that are needed to build one myself. I even compiled an entire kit list based on the components available at my local Arcade Shop. I say local as in located in my country.
With the fun we had at The Gamebox I finally figured I would actually try and build my own arcade cabinet. I have never done anything like it. The most I tinkered with electronics has been small things with the Raspberry PI, so this will be a great adventure! I ordered the basic components, obviously forgetting some important things because why not, and they came last week.
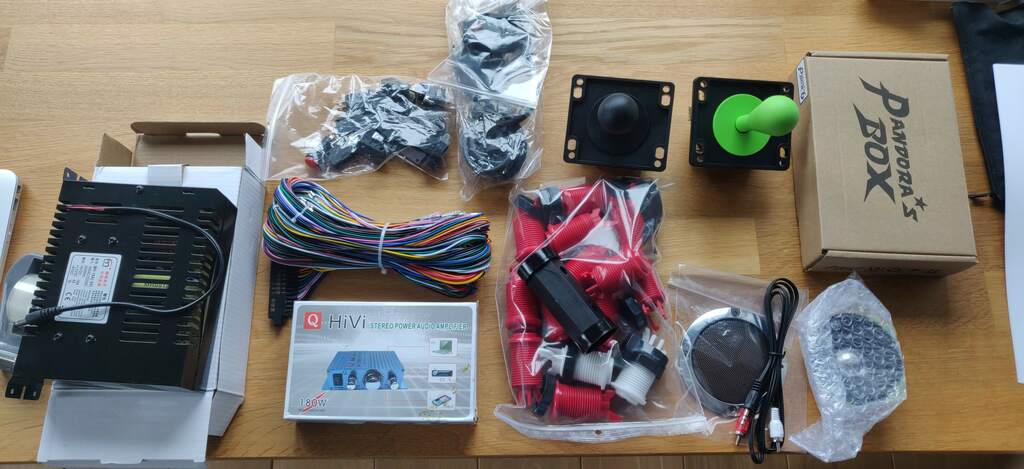
I chose to use a Pandora’s Box 6 as the main driver for the cabinet. This little box has 1300 games on it, which should keep us busy for quite a long time. It includes titles such as King of Fighters and Street Fighter, as well as some Pac-Man variants.
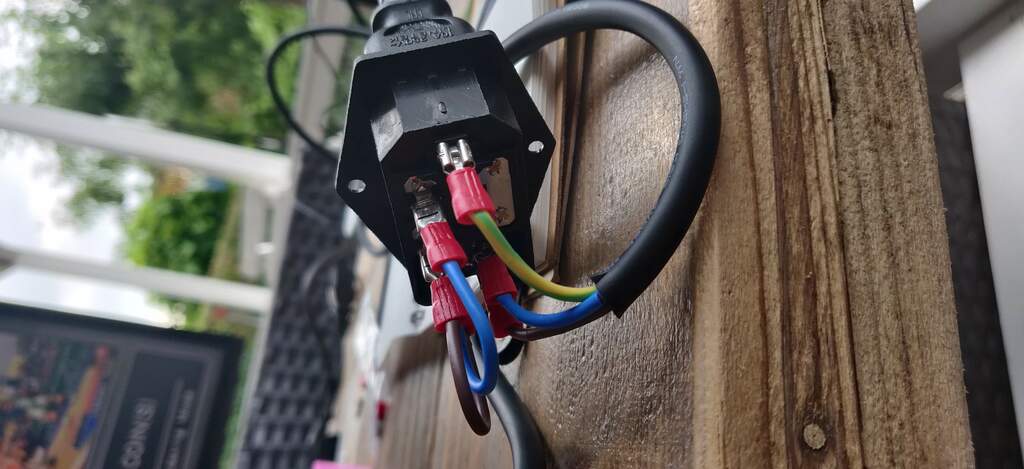
As the cabinet is meant for the whole family I got my kid involved in getting things connected, teaching him about electronics and wiring in the process. We took an old cable, cut off the end and stripped the wire to connect the power supply.
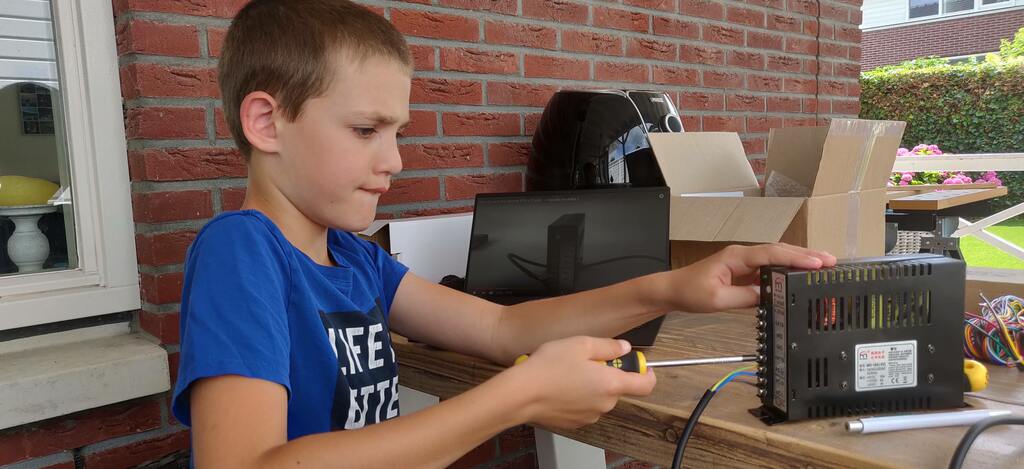
As I am new to most wiring operations I took the wires from an existing cable, looked up the meaning of the colors and connected them with the right endpoints on the power supply. To be complete, and for future reference here is an overview of colors and use in my cable.
| Color | Purpose |
|---|---|
| Green/Yellow | Ground |
| Brown | Live feed |
| Blue | Neutral |
To the powersupply we hooked up the Jamma Plus harness, which allows for 6 buttons for each player. This part was quite straightforward. Next the Jamma harness is connected to Pandora’s Box and it in turn uses a VGA cable to connect to the monitor. With all this connecting done, it is time for a first boot of the system to see if it actually runs.
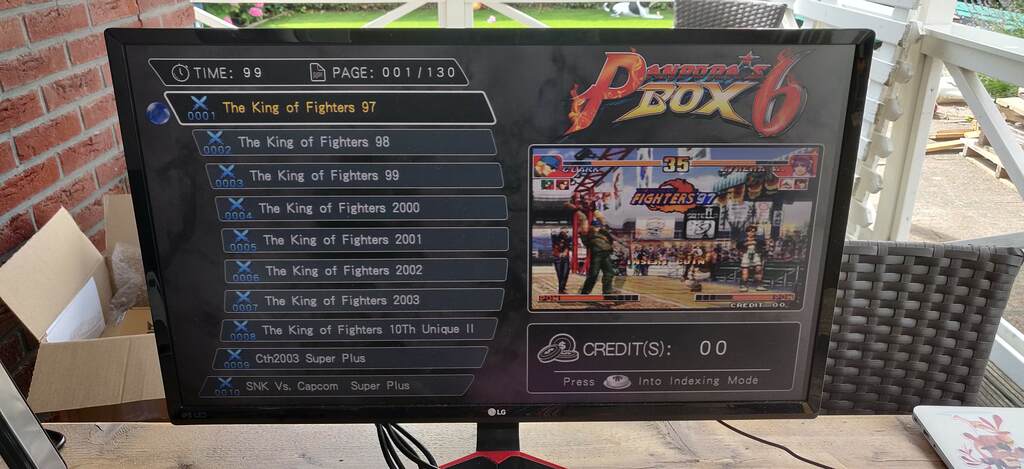
And it did! It was a great moment for the 2 of us. We did not blow anything up and our home-made wiring worked like a charm. The demo cycle of Pandora’s Box shows several of the games, page 1 of 130.
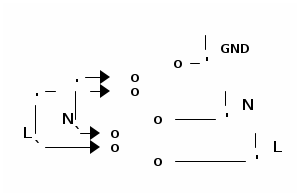
Next thing on my list was to wire up the power switch. I want to mount it on the side of the machine so that it is easy to disconnect it, without pulling the plug each time. For me this seemed liked the most daunting thing of the build, to get this right. Luckily I found some really neat diagrams on RetroActive Arcade, specifically this one.
In case it is needed for later reference, I ended up wiring the power switch using the following schematic.
The end result is a very neat little bundle of wires with an on/off switch.
With that working as well I now had a setup that I can turn on and off without messing with the power cable. A personal victory for me!
Now I wanted to get some buttons working. I connected P1 Start, pushed it many times and…. nothing happened. I played around with many buttons, but nothing worked. After a couple of hours I actually mailed Arno at Arcade Winkel for his advice.
It turns out there is a cable for Coin #1. In my Jamma harness it is bundled together with the yellow 12v wire and a black ground wire. All three wires are connected together in a connector for a digital coin counter. I just wanted to use a button for it, so I snipped the green wire and added a connector to it and connected it to a button.
The buttons use a Zippy Ultralight 20gr switch. I had to do quite some research to actually find out that the wiring of these is supposed to be common knowledge. To make sure I don’t forget and anybody else who needs it can find the wiring for these things; the Ground wire goes to the top one (COM), the colored wire from the Jamma harness goes to the 2nd one (NO) and the last one can be used to daisy chain the switch. If the other end is pressed, this switch will also fire, making it possible to have 2 buttons do the same thing.

With Coin #1 connected Pandora’s Box allows the addition of credits, after which the buttons actually start moving around and selecting items.
Things I learned so far:
- Stripping and adding connectors to wires
- Wiring the power supply by stripping cables
- Wiring button switches
- Wiring the joysticks
- Wiring the power switch
Stuff I got wrong when ordering:
- I was incomplete with my order, forgetting a speaker and grill, along with buttons for coins and reset
- The joystick I ordered has larger switches then the Jamma cables, so I needed to switch out the switches for ones that fit
- I now have too few switches to wire up the 2P buttons
Next steps:
- Create a test board to hold the buttons of P1 and P2
- Play some test games
- Order new Zippy switches and Tie-wraps
- Figure out the dimensions of the cabinet
- Order wood
To be continued.